
snakemake-workflows/dna-seq-benchmark


A snakemake workflow for benchmarking variant calling approaches with Genome in a Bottle (GIAB), CHM (syndip) or other custom datasets
Overview
Latest release: v1.17.0, Last update: 2026-07-15
Share link: https://snakemake.github.io/snakemake-workflow-catalog?wf=snakemake-workflows/dna-seq-benchmark
Quality control: linting: passed formatting: passed
Wrappers: bio/bcftools/index bio/bcftools/norm bio/bcftools/sort bio/bcftools/view bio/bwa/index bio/bwa/mem bio/mosdepth bio/picard/markduplicates bio/reference/ensembl-sequence bio/samtools/faidx bio/samtools/index bio/tabix/index bio/vembrane/table bio/vep/annotate bio/vep/cache bio/vep/plugins utils/datavzrd
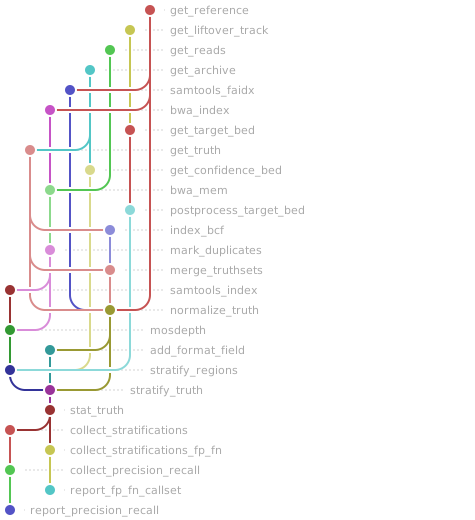
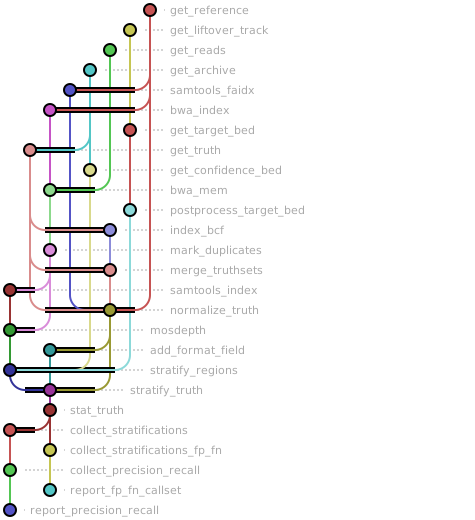
Workflow Rule Graph
This visualization of the workflow’s rule graph was automatically generated using Snakevision
Deployment
Step 1: Install Snakemake and Snakedeploy
Snakemake and Snakedeploy are best installed via the Conda package manager. It is recommended to install conda via Miniforge. Run
conda create -c conda-forge -c bioconda -c nodefaults --name snakemake snakemake snakedeploy
to install both Snakemake and Snakedeploy in an isolated environment. For all following commands ensure that this environment is activated via
conda activate snakemake
For other installation methods, refer to the Snakemake and Snakedeploy documentation.
Step 2: Deploy workflow
With Snakemake and Snakedeploy installed, the workflow can be deployed as follows. First, create an appropriate project working directory on your system and enter it:
mkdir -p path/to/project-workdir
cd path/to/project-workdir
In all following steps, we will assume that you are inside of that directory. Then run
snakedeploy deploy-workflow https://github.com/snakemake-workflows/dna-seq-benchmark . --tag v1.17.0
Snakedeploy will create two folders, workflow and config. The former contains the deployment of the chosen workflow as a Snakemake module, the latter contains configuration files which will be modified in the next step in order to configure the workflow to your needs.
Step 3: Configure workflow
To configure the workflow, adapt config/config.yml to your needs following the instructions below.
Step 4: Run workflow
The deployment method is controlled using the --software-deployment-method (short --sdm) argument.
To run the workflow with automatic deployment of all required software via conda/mamba, use
snakemake --cores all --sdm conda
Snakemake will automatically detect the main Snakefile in the workflow subfolder and execute the workflow module that has been defined by the deployment in step 2.
For further options such as cluster and cloud execution, see the docs.
Step 5: Generate report
After finalizing your data analysis, you can automatically generate an interactive visual HTML report for inspection of results together with parameters and code inside of the browser using
snakemake --report report.zip
Configuration
The following section is imported from the workflow’s config/README.md.
Configuration Guide
Please follow the instructions in the template config.yaml.
VAF (Variant Allele Frequency) Calculation
If your variant-calling pipeline does not write a VAF FORMAT field to the VCF, you can have the workflow calculate it and inject it into the VCF automatically. This enables VAF-stratified precision/recall reporting.
Option A: Calculate VAF from the AD (Allelic Depth) field
If your VCF (for example called with strelka) contains a standard AD FORMAT field (i.e., [ref_count, alt_count] for biallelic sites), simply set:
variant-calls:
  callset:
    my_callset:
      path: path/to/variant-calls.vcf.gz
      vaf-field: tbc # ← "to-be-calculated"
      benchmark: giab-na12878
      genome-build: grch38
vaf-field: tbc tells the Snakemake workflow to run calc-vaf.py --from-ad on the VCF, computing VAF as:
VAF = alt_count / (ref_count + alt_count)
The calculated VAF FORMAT field (Type=Float, Number=A) is written to results/calculate-vaf/{callset}.added-vaf.bcf, which then feeds downstream precision/recall and FP/FN analyses.
Option B: Calculate VAF from custom numerator / denominator fields
If your VCF lacks an AD field but has separate numerator and denominator FORMAT fields (e.g., AO and RO as in VCFs generated by freebayes), specify both:
variant-calls:
  callset:
    my_callset:
      path: path/to/variant-calls.vcf.gz
      vaf-field: tbc
      vaf-numerator:
        field: FORMAT
        name: AO
      vaf-denominator:
        field: FORMAT
        name: RO
      benchmark: giab-na12878
      genome-build: grch38
The workflow will run:
calc-vaf.py --num-field FORMAT --num-name AO \
            --den-field FORMAT --den-name RO
which computes VAF = AO / RO per sample.
The same vaf-numerator/vaf-denominator pattern works with field: INFO for INFO-level fields.
Option C: Use a pre-existing VAF field
If your VCF already contains a VAF-like field, point to it directly instead of using tbc:
variant-calls:
  callset:
    my_callset:
      path: path/to/variant-calls.vcf.gz
      vaf-field:
        field: FORMAT
        name: AF
      benchmark: giab-na12878
      genome-build: grch38
The workflow will not recalculate VAF; it reads the field directly during precision/recall analysis. You can verify the field name with:
bcftools view -h path/to/variant-calls.vcf.gz
Linting and formatting
Linting results
All tests passed!
Formatting results
All tests passed!